JitsiMeet Docker 安装及负载均衡配置

image-20230625233244755

jitsi 是一款开源的视屏会议软件,最大支持 75 人同时在线。本文将介绍如何在 docker 中安装和使用 jitsi。本文主要以 Ubuntu 为例,若是 Windows,建议使用 wsl 进行安装。

安装 Docker

Windows: 下载 Download Docker Desktop | Docker 进行安装

Ubuntu: Install Docker Engine on Ubuntu

安装 Jitsi-meet

本节主要参考:Self-Hosting Guide - Docker | Jitsi Meet

  1. 下载最新发布版本

    1
    2
    3
    # 查找最新版本下载地址,然后使用 wget 下载
    # 下载后的文件可能没有后缀,需要使用 mv 添加一个 `.zip` 后缀
    wget $(curl -s https://api.github.com/repos/jitsi/docker-jitsi-meet/releases/latest | grep 'zip' | cut -d\" -f4)
  2. 解压

    1
    unzip <filename>
  3. 配置 .env

    1
    2
    # 复制示例配置
    cp env.example .env
  4. 设置强密码

    1
    2
    3
    4
    # linux 中,在 .env 目录中执行
    # 若执行报错,主检查 ./gen-passwords.sh 的结束符是否为 LF
    # 可以通过 cat ./gen-passwords.sh -ne 查看结束符,若为 ^M$ 为则 CRLF,若为 $ 则是 LF
    bash ./gen-passwords.sh
  5. 创建所需的 CONFIG 目录

    Linux

    1
    mkdir -p ~/.jitsi-meet-cfg/{web,transcripts,prosody/config,prosody/prosody-plugins-custom,jicofo,jvb,jigasi,jibri}

    Windows

    1
    echo web,transcripts,prosody/config,prosody/prosody-plugins-custom,jicofo,jvb,jigasi,jibri | % { mkdir "~/.jitsi-meet-cfg/$_" }
  6. 启动服务

    1
    docker compose up -d
  7. 浏览器访问 https://localhost:8443

下面将介绍如何进行生产环境配置,修改完成后,需要再次执行以下命令重新应用配置

1
2
docker compose down
docker compose up -d

修改 .env 进行自定义配置

编辑 .env 文件

1
vim .env

修改内容如下:

1
2
3
4
5
6
7
8
9
10
11
12
13
14
15
16
17
18
19
20
21
22
23
24
25
26
27
28
29
30
31
32
33
# 修改 Docker 对外暴露的端口
# Exposed HTTP port
HTTP_PORT=7080
# Exposed HTTPS port
HTTPS_PORT=7043

# 修改访问的网址
# Public URL for the web service (required)
# 如果是本机测试,不要添加协议,但要添加端口,如下
# PUBLIC_URL=192.168.3.240:7043
# 若是外部地址非 443 端口,需要自行添加
PUBLIC_URL=https://yourdomain

# 容器主机的 IP, 当服务器位于 NAT 环境时,需要配置
# 特别注意,要同时配置容器 host ip 和 public ip
JVB_ADVERTISE_IPS=192.168.23.12,public-ip

# 添加 jwt 认证
# Enable authentication
ENABLE_AUTH=1
# 创建房间后,其他人只需要输入房间名称即可进入
# Enable guest access
ENABLE_GUESTS=1
# Select authentication type: internal, jwt, ldap or matrix
AUTH_TYPE=jwt
# JWT authentication
# Application identifier
JWT_APP_ID=my_jitsi_app_id
# Application secret known only to your token generator
JWT_APP_SECRET=my_jitsi_app_secret

# 取消自动赋予 owner
ENABLE_AUTO_OWNER=false

所有 .env 的配置,可在以下地方查到:

docker-jitsi-meet/jicofo/rootfs/defaults/jicofo.conf

配置 jwt 授权

jitsi 默认任何人都可以创建房间,为了使自建的 jitsi 资源不被恶意使用,需要限制创建房间的权限。

通过 修改 .env 配置文件 来添加权限认证,当 ENABLE_AUTH=1 后,只有有合法正确的 jwt 值时,才可以新建房间。

具体的 .env 配置如下

1
2
3
4
5
6
7
# Select authentication type: internal, jwt, ldap or matrix
AUTH_TYPE=jwt
# JWT authentication
# Application identifier
JWT_APP_ID=my_jitsi_app_id
# Application secret known only to your token generator
JWT_APP_SECRET=my_jitsi_app_secret

在生成 jwt 时,payload 内容如下:

1
2
3
4
5
6
7
8
9
10
11
12
13
14
15
16
17
18
19
{
"context": {
"user": {
"avatar": "https:/gravatar.com/avatar/abc123",
"name": "John Doe",
"email": "[email protected]",
"id": "abcd:a1b2c3-d4e5f6-0abc1-23de-abcdef01fedcba",
"affiliation": "owner or member", // 需要使用 mod_token_affiliation 插件
},
"group": "a123-123-456-789"
},
"aud": "*",
"iss": "your_app_id",
"sub": "meet.jitsi.com",
"room": "your_room or *",
"moderator": true, // 需要使用 mod_token_moderation 插件
"nbf": 1664475176,
"exp": 1695998576
}

可以通过 JSON Web Tokens - jwt.io 来生成 token,然后在 url 后面添加 jwt=your-token 参数来传递授权进行使用。

例如:https://your-domain/room-name?jwt=your-token

插件

插件位置

docker-compose.yml 文件中可知,自定义插件被挂载到了 ${CONFIG}/prosody/prosody-plugins-custom 中,$(CONFIG) 默认值为 ~/.jitsi-meet-cfg

image-20241108110315365

因此,可以将自定义插件保存到 ~/.jitsi-meet-cfg/prosody/prosody-plugins-custom

插件查找

当功能不满足要求时,可以从以下地址查找插件实现:

  1. jitsi-contrib/prosody-plugins: Prosody plugins for Jitsi
  2. jitsi-meet/resources/prosody-plugins
  3. 在 github 上搜索 jitsi mod

设置用户角色

jitsi 默认所有使用 token 加入会议的用户都有主持人,为了更好地管理会议,可以使用插件通过 token 的 payloads 来分配所属角色。

目前找到两个插件皆可实现该功能,但测试下来,都有一些 bug :

  1. prosody-plugins/token_affiliation

    这个插件通过在用户加入会议后,再次修改角色来实现权限控制,但它存在滞后性,经常用户加入会议后,提示为主持人,然后才被修改为普通成员

  2. jitsi-token-moderation-plugin/mod_token_moderation.lua

    这个插件通过重写 set_affiliation 方法来实现控制

    但是会议中,无法为其它用户分配主持人角色

经权衡,最终选择方案 2

mod_token_affiliation 插件

插件安装

1
2
3
cd ~/.jitsi-meet-cfg/prosody/prosody-plugins-custom
# 下载
wget -O mod_token_affiliation.lua https://raw.githubusercontent.com/jitsi-contrib/prosody-plugins/main/token_affiliation/mod_token_affiliation.lua

启用插件

打开 .env 文件,添加如下内容:

1
2
3
4
5
# 取消自动赋予 owner
ENABLE_AUTO_OWNER=false
# 启用组件,多个组件之间使用 , 号分隔
# token_verification 是系统默认的组件
XMPP_MUC_MODULES=token_verification,token_affiliation

生成 token 时,向 content.user 中添加 affiliation 字段,示例如下:

1
2
3
4
5
6
7
8
9
10
11
12
13
14
15
{
"aud": "myapp",
"iss": "myapp",
"sub": "meet.mydomain.com",
"iat": 1601366000,
"exp": 1601366180,
"room": "*",
"context": {
"user": {
"name": "myname",
"email": "[email protected]",
"affiliation": "owner" // 选项: owner、member、空
}
}
}

方案 2

安装插件

1
2
3
cd ~/.jitsi-meet-cfg/prosody/prosody-plugins-custom
# 下载
wget https://raw.githubusercontent.com/nvonahsen/jitsi-token-moderation-plugin/refs/heads/master/mod_token_moderation.lua

启用插件

打开 .env 文件,添加如下内容:

1
2
# 启用组件,多个组件之间使用 , 号分隔
XMPP_MUC_MODULES=token_moderation

生成 token 时,添加 moderator 字段,示例如下:

1
2
3
4
5
6
7
8
9
10
11
12
13
14
15
16
17
18
19
{
"context": {
"user": {
"avatar": "https:/gravatar.com/avatar/abc123",
"name": "John Doe",
"email": "[email protected]",
"id": "abcd:a1b2c3-d4e5f6-0abc1-23de-abcdef01fedcba",
"affiliation": "owner or member", // 需要使用 mod_token_affiliation 插件
},
"group": "a123-123-456-789"
},
"aud": "*",
"iss": "your_app_id",
"sub": "meet.jitsi.com",
"room": "your_room or *",
"moderator": true, // 需要使用 mod_token_moderation 插件
"nbf": 1664475176,
"exp": 1695998576
}

添加事件回调

本节主要参考:prosody-plugins/event_sync

jitis meet 使用 prosody 进行即时通讯,诸多业务都可以使用 prosody 插件来实现,本节使用event_sync/mod_event_sync_component.lua 插件来实现事件回调

为了接入既有系统,需要获取会议的创建结束信息,通过该插件来添加事件回调到既有的系统中。

插件安装

1
2
3
4
# 进入自定义插件库
cd ~/.jitsi-meet-cfg/prosody/prosody-plugins-custom
# 下载插件
wget -O mod_event_sync_component.lua https://raw.githubusercontent.com/jitsi-contrib/prosody-plugins/main/event_sync/mod_event_sync_component.lua

插件修改

可以使用 vscode 远程服务器后对文件进行修改

回调返回 display_name

原插件没有返回用户的 display_name,当用户通过网址进入时,无法确定用户的身份,因此需要返回用户自己设置的 display_name 供回调服务器处理。

修改 occupant_joined 调用:

1
2
3
4
5
-- 找到 occupant_joined 函数调用位置
-- 将
local occupant_data = room_data:on_occupant_joined(occupant_jid, event.origin);
-- 修改为
local occupant_data = room_data:on_occupant_joined(occupant_jid, event);

修改 EventData:on_occupant_joined 函数:

1
2
3
4
5
6
7
8
9
10
11
12
13
14
15
16
17
18
19
20
21
22
23
24
25
-- 找到 EventData:on_occupant_joined 函数,修改为如下代码:

function EventData:on_occupant_joined(occupant_jid, event)
local event_origin = event.origin
local user_context = event_origin.jitsi_meet_context_user or {};

-- get displayName
local display_name = event.occupant:get_presence():get_child_text('nick', 'http://jabber.org/protocol/nick');

-- N.B. we only store user details on join and assume they don't change throughout the duration of the meeting
local occupant_data = {
occupant_jid = occupant_jid,
name = user_context.name,
id = user_context.id,
email = user_context.email,
joined_at = now(),
left_at = nil,
display_name = display_name
};

self.occupants[occupant_jid] = occupant_data;
self.active[occupant_jid] = true;

return occupant_data;
end

添加单点参会功能

可选,实践下来不太好用

本节参考:mod_http_muc_kick - Prosody Community Modules

当用户加入后,检测是否有同名用户,若有,则踢出存在的同名用户,保证同一时间,只有一个同名用户参会

1
2
3
4
5
6
7
8
9
10
11
12
13
14
15
16
17
18
19
20
21
22
23
24
25
26
27
28
29
-- 1. 在顶部添加导入
local st = require "util.stanza"

-- 2. 找到 function occupant_joined(event) 方法,在 `local occupant_data = room_data:on_occupant_joined(occupant_jid, event);` 之后添加如下代码

for _, occupant in room:each_occupant() do
local pr = occupant:get_presence();
local displayName = pr:get_child_text(
'nick', 'http://jabber.org/protocol/nick');
if displayName == occupant_data.display_name and occupant.nick~=occupant_data.nick then
-- 获取原用户的角色, 若为moderator, 则将新用户设置为moderator
local oldRole = room:get_role(occupant.nick);
room:set_role(true, occupant.nick, nil);
if oldRole == 'moderator' then
room:set_role(true, occupant_data.occupant_jid, 'moderator');
room:set_affiliation(true, occupant_data.occupant_jid, 'owner');
end

room:set_role(true, occupant.nick, nil);
module:log('info', '踢出用户 %s kicked %s from %s',displayName, occupant.nick, room.jid);
-- 发送 kickParticipant 命令
local presence = st.presence({
to = occupant.jid,
from = room.jid,
type = "unavailable"
}):tag("status"):text("你已被移出房间 " .. room.jid):up();
module:send(presence);
end
end

启用插件

~/.jitsi-meet-cfg/prosody/config/conf.d 目录中添加以 .cfg.lua 为后缀的配置文件,配置文件格式参考 ~/.jitsi-meet-cfg/prosody/config/prosody.cfg.lua

~/.jitsi-meet-cfg/prosody/config/prosody.cfg.lua 是 prosody 的配置入口文件,conf.d 目录中任何 .cfg.lua 都会被包含在这个配置中。

每个插件建议都新建一个配置文件,保证配置独立。

1
2
3
4
# 进入到配置目录
cd ~/.jitsi-meet-cfg/prosody/config/conf.d
# 创建 event_sync.cfg.lua 配置
sudo touch event_sync.cfg.lua

编辑 sudo vim event_sync.cfg.lua 配置,添加如下内容:

1
2
3
Component "event_sync.meet.jitsi" "event_sync_component"
muc_component = "conference.meet.jitsi"
api_prefix = "http://your.api.server/api"

注意:api_prefix 末尾没有 / 号

更多配置,参考:prosody-plugins/event_sync/README.md

该组件回调的 api 为:post http://your.api.server/api/events/xx

触发的事件回调如下:

1
2
3
4
local URL_EVENT_ROOM_CREATED = api_prefix..'/events/room/created';
local URL_EVENT_ROOM_DESTROYED = api_prefix..'/events/room/destroyed';
local URL_EVENT_OCCUPANT_JOINED = api_prefix..'/events/occupant/joined';
local URL_EVENT_OCCUPANT_LEFT = api_prefix..'/events/occupant/left';

打开防火墙端口

docker-jitsi-meeting 中的通信结构如下图所示
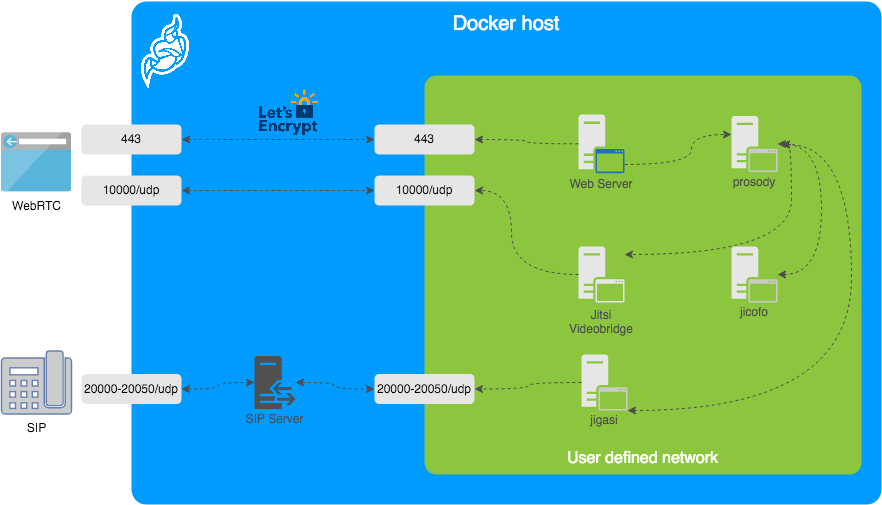
  • 80,443/tcp 是 UI 的 web 端口

    80,443 通过 修改 .env 配置文件 章节进行指定,本文中分别修改为:7080,7043

  • 10000/udp 是 RTP media 端口,即 Jitsi Vedio Bridge 使用的端口

通过以下命令新建防火墙入站规则:

windows 中:

1
2
3
4
5
# 开放 tcp
netsh advfirewall firewall add rule name=jitsi-meeting-tcp dir=in action=allow protocol=TCP localport=7043,7080

# 开放 udp
netsh advfirewall firewall add rule name=jitsi-meeting-udp dir=in action=allow protocol=UDP localport=10000

ubuntu 中:

1
2
sudo ufw allow 7043,7080/tcp
sudo ufw allow 10000/udp

配置端口转发

若服务器位于 NAT 中,需要在 NAT 中配置端口转发,将外网的 80/tcp,443/tcp,10000/udp 端口分别转发到服务器对应的端口上。

配置 nginx 反向代理

有时候外网的80,443 被 nginx 占用了,我们需要设置 nginx 反向代理 jitsi,此时需要将 10000/udp 转发到 docker 所在服务器,然后在 nginx 中添加如下设置:

1
2
3
4
5
6
7
8
9
10
11
12
13
14
15
16
17
18
19
20
21
22
23
24
25
26
27
28
29
30
31
32
33
34
35
36
37
38
39
40
41
42
43
44
45
46
47
48
# nginx.conf 主文件
http {
include mime.types;

# http_servers/jitsi.conf
# jitsi 会议配置
server {
listen 443 ssl;
server_name yourdomain;

ssl_certificate F:/encrypt/keys/root/fullchain.pem;
ssl_certificate_key F:/encrypt/keys/root/privkey.pem;

ssl_session_cache shared:SSL:1m;
ssl_session_timeout 5m;

ssl_ciphers HIGH:!aNULL:!MD5;
ssl_prefer_server_ciphers on;

location / {
proxy_pass https://192.168.23.12:7043;
proxy_connect_timeout 600;
proxy_read_timeout 600;
proxy_set_header Upgrade $http_upgrade;
proxy_set_header Connection "upgrade";
proxy_set_header X-Forwarded-For $proxy_add_x_forwarded_for;
proxy_set_header Host $host;
}

location /xmpp-websocket {
proxy_pass https://192.168.23.12:7043;
proxy_http_version 1.1;
proxy_set_header Upgrade $http_upgrade;
proxy_set_header Connection "upgrade";
}

location /colibri-ws {
proxy_pass https://192.168.23.12:7043;
proxy_http_version 1.1;
proxy_set_header Upgrade $http_upgrade;
proxy_set_header Connection "upgrade";
}

add_header Access-Control-Allow-Origin "*";
default_type 'text/html';
charset utf-8;
}
}

完成上述步骤的设置后,即可通过 https://yourdomain 来进行访问了

通过 IFrame 集成进现有系统

可以使用 IFrame API与现有系统进行集成。

  1. 加载 external_api

    1
    <script src='https://<your-domain>/external_api.js'></script>
  2. 实例化 api

    1
    api = new JitsiMeetExternalAPI(domain, options)

jitsi 相关镜像简介

  • base

    Debian stable base image with the S6 Overlay for process control and the Jitsi repositories enabled. All other images are based on this one.

  • base-java

    Same as the above, plus Java (OpenJDK).

  • web

    Jitsi Meet web UI, served with nginx.

    Jitsi Meet 的 web 界面

  • prosody

    Prosody, the XMPP server.

    用于即时通讯的开源库

  • jicofo

    Jicofo, the XMPP focus component.

  • jvb

    Jitsi Videobridge, the video router.

    Jitsi 的视屏中转中心,处理视屏流的分发

  • jigasi

    Jigasi, the SIP (audio only) gateway.

  • jibri

    Jibri, the broadcasting infrastructure.

参考

本文参考以下文章,在此致以诚挚谢意!

jitsi/docker-jitsi-meet: Jitsi Meet on Docker

Self-Hosting Guide - Docker | Jitsi Meet

lib-jitsi-meet/doc/tokens.md at master · jitsi/lib-jitsi-meet · GitHub

prosody-plugins/event_sync/README.md at main · jitsi-contrib/prosody-plugins · GitHub

IFrame API | Jitsi Meet

A tutorial on how to customize the Jitsi meet front end - Meetrix.IO

JSON Web Token (JWT) authentication Prosody plugin

jitsi-meet/resources/prosody-plugins

The Jitsi JSON Web Token (JWT)