Windows Terminal 终端安装及美化

常规展示

Windows 上的终端难用又难看,直到我遇到了 Windows Terminal 和 Powershell 7。那丝滑般的操作手感,美得不可方物的界面,还有其强大的功能支持,瞬间坠入爱河,爱了爱了~

由于 WindowsTerminal 设置已经 UI 可视化,因此该文章已经弃用。关于 Powershell 的相关配置,已经更新到 PowerShell 的分类中

下面我们就一步一步开始安装和配置。

安装 Windows Terminal

  1. 如果是 win10,直接去 Microsoft Store 搜索 Windows Terminal 下载即可;

  2. 如果是 windows server,按照以下步骤进行安装:

    • 下载 GitHub 下载 .msixbundle 软件包,Releases · microsoft/terminal (github.com)

    • 用管理员身份运行 Powershell,在里面输入如下命令进行安装

      1
      Add-AppPackage 安装包的全路径名称

      路径如果有空格,需要用双引号括起来。

  3. 还可以通过 scoop 进行安装

    1
    scoop install windows-terminal

安装字体

这里仅推荐一款字体:Fira Code。该字体支持 ligature 连字功能,而且是一款专门为代码显示准备的字体。该字体开源,广受海内外程序员好评!

单击此处从 GitHub 下载

下载完成后,解压,然后打开 ttf 目录,全选,右键点击安装。

otf 与 ttf 的字体区别在于 ttf 字体定位更准,建议使用 ttf。

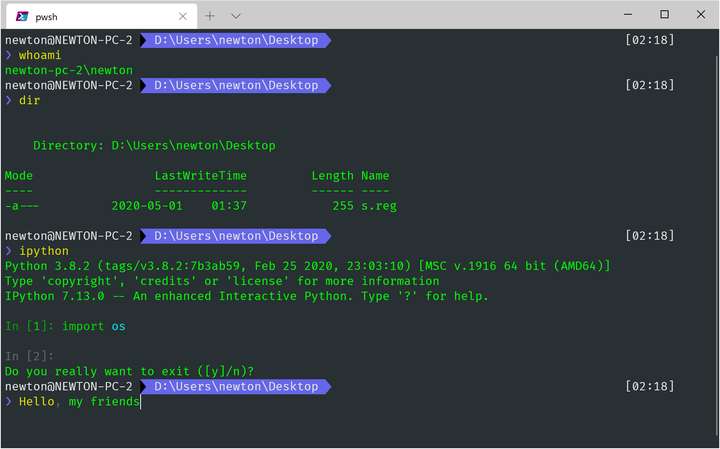
安装新款 Powershell Core

首先声明,我们这儿用的 Powershell 与 Windows 自带的 Powershell 是完全不同的两个东西,除了功能相似和名字相同,两者内在已经天差地别。

自带的 Powershell 错误提示冗长颜值低速度慢,总之就是不值得去用。

那么 Powershell Core 是什么呢?这是伟大的 .Net Core 跨平台战略的一个重要组成部分,微软设想,要让强大的 .Net 在所有平台上通用,让这么强大的 Powershell 在所有平台上都能用,古老的 bash 可以退休了!

基于以上愿景,微软开始了漫长而辉煌的征程。

下载地址:Releases · PowerShell/PowerShell (github.com)

安装过程中会提示安装选项,全部勾选就可以了。
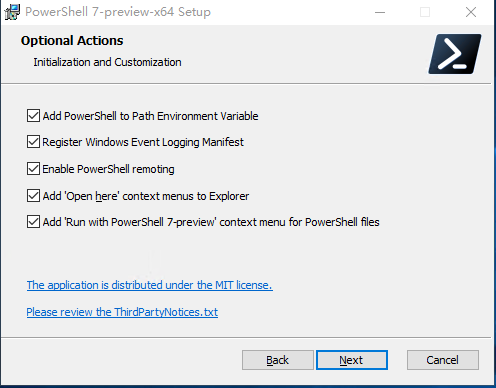
安装界面

上面的各个选项分别是:

  • 添加 PowerShell 到环境变量
  • 注册到 Windows 事件
  • 允许 PowerShell 远程
  • 在文件管理器中右键菜单
  • 给 PowerShell 文件添加用 PowerShell 7-preview 右键菜单

安装 Powershell 插件

这一步是整个过程的灵魂。

直接上代码:打开刚装好的新版 powershell,逐行输入命令。

1
2
3
4
5
6
7
8
9
10
11
# 1. 安装 PSReadline 包,该插件可以让命令行很好用,类似 zsh
Install-Module -Name PSReadLine -AllowPrerelease -Force

# 2. 安装 posh-git 包,让你的 git 更好用
Install-Module posh-git -Scope CurrentUser

# 3. 安装 oh-my-posh 包,让你的命令行更酷炫、优雅
Install-Module oh-my-posh -Scope CurrentUser

# 4。安装 ZLocation,可以通过 z xx(xx是路径的关键词) 快速定位路径
Install-Module ZLocation -Scope CurrentUser

安装过程可能有点慢,好像卡住了一样,但是请耐心等待几分钟。另外,可能需要挂代理才能下载、安装。这几个包的都不大,所以如果迟迟装不上,就基本上是网络问题。

后面两个包的来源可能不受系统信任,不用管它,如果让你选择是否信任,直接输入 Y 即可。

配置 Windows Terminal

这一项也是灵魂。

只有新款 Powershell 而没有 Windows Terminal,好比吃肉不放盐。

打开Windows Terminal,然后按快捷键 Ctrl+Shift+, 打开配置文件,直接上配置代码,遇到不懂的地方,自己读注释。记得将此设置默认配置(代码已经给出)。

1
2
3
4
5
6
7
8
9
10
11
12
13
14
15
16
17
18
19
20
21
22
23
24
25
26
27
28
29
30
31
32
33
34
35
36
37
38
39
40
41
42
43
44
45
46
47
48
49
50
51
52
53
54
55
56
57
58
59
60
61
62
63
64
65
66
67
68
69
70
71
72
73
74
75
76
77
78
79
80
81
82
83
84
85
86
87
88
89
90
91
92
93
94
95
96
97
98
99
100
101
102
103
104
105
106
107
108
109
110
111
112
113
114
115
116
117
118
119
120
121
122
123
124
125
126
127
128
// This file was initially generated by Windows Terminal Preview 1.4.2652.0
// It should still be usable in newer versions, but newer versions might have additional
// settings, help text, or changes that you will not see unless you clear this file
// and let us generate a new one for you.

// To view the default settings, hold "alt" while clicking on the "Settings" button.
// For documentation on these settings, see: https://aka.ms/terminal-documentation
{
"$schema": "https://aka.ms/terminal-profiles-schema",

// 默认的配置就是我们的新 powershell(重要!!!)
// 认准这个Id: "{574e775e-4f2a-5b96-ac1e-a2962a402336}"
"defaultProfile": "{574e775e-4f2a-5b96-ac1e-a2962a402336}",

// You can add more global application settings here.
// To learn more about global settings, visit https://aka.ms/terminal-global-settings

// If enabled, selections are automatically copied to your clipboard.
"copyOnSelect": false,

// If enabled, formatted data is also copied to your clipboard
"copyFormatting": false,

// A profile specifies a command to execute paired with information about how it should look and feel.
// Each one of them will appear in the 'New Tab' dropdown,
// and can be invoked from the commandline with `wt.exe -p xxx`
// To learn more about profiles, visit https://aka.ms/terminal-profile-settings
"profiles":
{
"defaults":
{
// Put settings here that you want to apply to all profiles.
"startingDirectory" : ".",
"useAcrylic": true
},
"list":
[
{
// Make changes here to the powershell.exe profile.
"guid": "{61c54bbd-c2c6-5271-96e7-009a87ff44bf}",
"name": "Windows PowerShell",
"commandline": "powershell.exe",
"hidden": true // 隐藏原来的 PowerShell
},
{
// Make changes here to the cmd.exe profile.
"guid": "{0caa0dad-35be-5f56-a8ff-afceeeaa6101}",
"name": "命令提示符",
"commandline": "cmd.exe",
"hidden": true // 隐藏 cmd
},
{
"guid": "{b453ae62-4e3d-5e58-b989-0a998ec441b8}",
"hidden": true, // 隐藏 Azure Cloud Shell
"name": "Azure Cloud Shell",
"source": "Windows.Terminal.Azure"
},
{
"guid": "{574e775e-4f2a-5b96-ac1e-a2962a402336}",
"hidden": false,
"name": "PowerShell",
// 注意:一定要写上 -nologo,否则开启 powershll 会有一段话输出,很讨厌!
// 路径自己去核实,如果是正式版本,就是 .../7/pwsh.exe
"commandline": "C:/Program Files/PowerShell/7-preview/pwsh.exe -nologo",
"source": "Windows.Terminal.PowershellCore",
// 启动菜单一定要设置为 <.>,否则后面重要的一步将会无效!
"startingDirectory": ".",
// 字体
"fontFace": "Fira Code",
"fontSize": 11,
"historySize": 9001,
"padding": "5, 5, 20, 25",
"snapOnInput": true,
"useAcrylic": false,
// 颜色
"colorScheme": "Homebrew"
}
]
},

// Add custom color schemes to this array.
// To learn more about color schemes, visit https://aka.ms/terminal-color-schemes
"schemes": [
// Homebrew 配色,该配色经过 刘鹏 改良
{
"name": "Homebrew",
"black": "#000000",
"red": "#FC5275",
"green": "#00a600",
"yellow": "#999900",
"blue": "#6666e9",
"purple": "#b200b2",
"cyan": "#00a6b2",
"white": "#bfbfbf",
"brightBlack": "#666666",
"brightRed": "#e50000",
"brightGreen": "#00d900",
"brightYellow": "#e5e500",
"brightBlue": "#0000ff",
"brightPurple": "#e500e5",
"brightCyan": "#00e5e5",
"brightWhite": "#e5e5e5",
"background": "#283033",
"foreground": "#00ff00"
},
],

// Add custom actions and keybindings to this array.
// To unbind a key combination from your defaults.json, set the command to "unbound".
// To learn more about actions and keybindings, visit https://aka.ms/terminal-keybindings
"actions":
[
// Copy and paste are bound to Ctrl+Shift+C and Ctrl+Shift+V in your defaults.json.
// These two lines additionally bind them to Ctrl+C and Ctrl+V.
// To learn more about selection, visit https://aka.ms/terminal-selection
{ "command": {"action": "copy", "singleLine": false }, "keys": "ctrl+c" },
{ "command": "paste", "keys": "ctrl+v" },

// Press Ctrl+Shift+F to open the search box
{ "command": "find", "keys": "ctrl+shift+f" },

// Press Alt+Shift+D to open a new pane.
// - "split": "auto" makes this pane open in the direction that provides the most surface area.
// - "splitMode": "duplicate" makes the new pane use the focused pane's profile.
// To learn more about panes, visit https://aka.ms/terminal-panes
{ "command": { "action": "splitPane", "split": "auto", "splitMode": "duplicate" }, "keys": "alt+shift+d" }
]
}

特别注意,用其他配色可能降低颜值

添加 Powershell 启动参数

在 powershell 中输入

1
notepad.exe $Profile

紧接着在弹出的页面中输入下面这一长串代码,保存并关闭。这个 Profile 配置文件与 .zshrc / .bashrc 文件一样,都是控制启动前参数的。

1
2
3
4
5
6
7
8
9
10
11
12
13
14
15
16
17
18
19
20
21
22
23
24
25
26
27
28
29
30
31
32
33
34
35
36
37
38
39
40
41
42
43
44
45
46
47
48
49
50
51
52
53
54
55
56
57
58
59
60
61
62
63
64
65
66
67
68
69
70
71
72
73
74
75
76
77
78
79
80
81
82
83
84
85
86
87
88
89
90
91
92
93
94
95
96
97
98
99
100
101
<#
* FileName: Microsoft.PowerShell_profile.ps1
* Author: 刘 鹏
* Email: [email protected]
* Date: 2020, May. 1
* Copyright: No copyright. You can use this code for anything with no warranty.
#>


#------------------------------- Import Modules BEGIN -------------------------------
# 引入 posh-git
Import-Module posh-git

# 引入 oh-my-posh
Import-Module oh-my-posh

# 设置 PowerShell 主题
Set-PoshPrompt -Theme Paradox
#------------------------------- Import Modules END -------------------------------


#------------------------------- Set Hot-keys BEGIN -------------------------------
# 设置 Tab 键补全
# Set-PSReadlineKeyHandler -Key Tab -Function Complete

# 设置 Ctrl+d 为菜单补全和 Intellisense
Set-PSReadLineKeyHandler -Key "Tab" -Function MenuComplete

# 设置 Ctrl+d 为退出 PowerShell
Set-PSReadlineKeyHandler -Key "Ctrl+d" -Function ViExit

# 设置 Ctrl+z 为撤销
Set-PSReadLineKeyHandler -Key "Ctrl+z" -Function Undo

# 设置向上键为后向搜索历史记录
Set-PSReadLineKeyHandler -Key UpArrow -Function HistorySearchBackward

# 设置向下键为前向搜索历史纪录
Set-PSReadLineKeyHandler -Key DownArrow -Function HistorySearchForward
#------------------------------- Set Hot-keys END -------------------------------


#------------------------------- 引用与上述冲突的模块 BEGIN -------------------------------

# 引用模块 ZLocation,必须放到上面模块设置完成后的位置,否则会不生效
Import-Module ZLocation

#------------------------------- Functions BEGIN -------------------------------


#------------------------------- Functions BEGIN -------------------------------
# Python 直接执行
$env:PATHEXT += ";.py"

# 更新 pip 的方法
function Update-Packages {
# update pip
Write-Host "Step 1: 更新 pip" -ForegroundColor Magenta -BackgroundColor Cyan
$a = pip list --outdated
$num_package = $a.Length - 2
for ($i = 0; $i -lt $num_package; $i++) {
$tmp = ($a[2 + $i].Split(" "))[0]
pip install -U $tmp
}

# update TeX Live
$CurrentYear = Get-Date -Format yyyy
Write-Host "Step 2: 更新 TeX Live" $CurrentYear -ForegroundColor Magenta -BackgroundColor Cyan
tlmgr update --self
tlmgr update --all
}
#------------------------------- Functions END -------------------------------


#------------------------------- Set Alias Begin -------------------------------
# 1. 编译函数 make
function MakeThings {
nmake.exe $args -nologo
}
Set-Alias -Name make -Value MakeThings

# 2. 更新系统 os-update
Set-Alias -Name os-update -Value Update-Packages

# 3. 查看目录 ls & ll
function ListDirectory {
(Get-ChildItem).Name
Write-Host("")
}
Set-Alias -Name ls -Value ListDirectory
Set-Alias -Name ll -Value Get-ChildItem
#------------------------------- Set Alias END -------------------------------

到此,配置完成!在命令行里面狂欢吧。

参考

[1] 原文链接:Windows Terminal 完美配置 PowerShell 7.1

[2] awesome-powershell

[3] posh-git

[4] PSReadLine

[5] ZLocation

[6] oh-my-posh

[7] 其它参考